
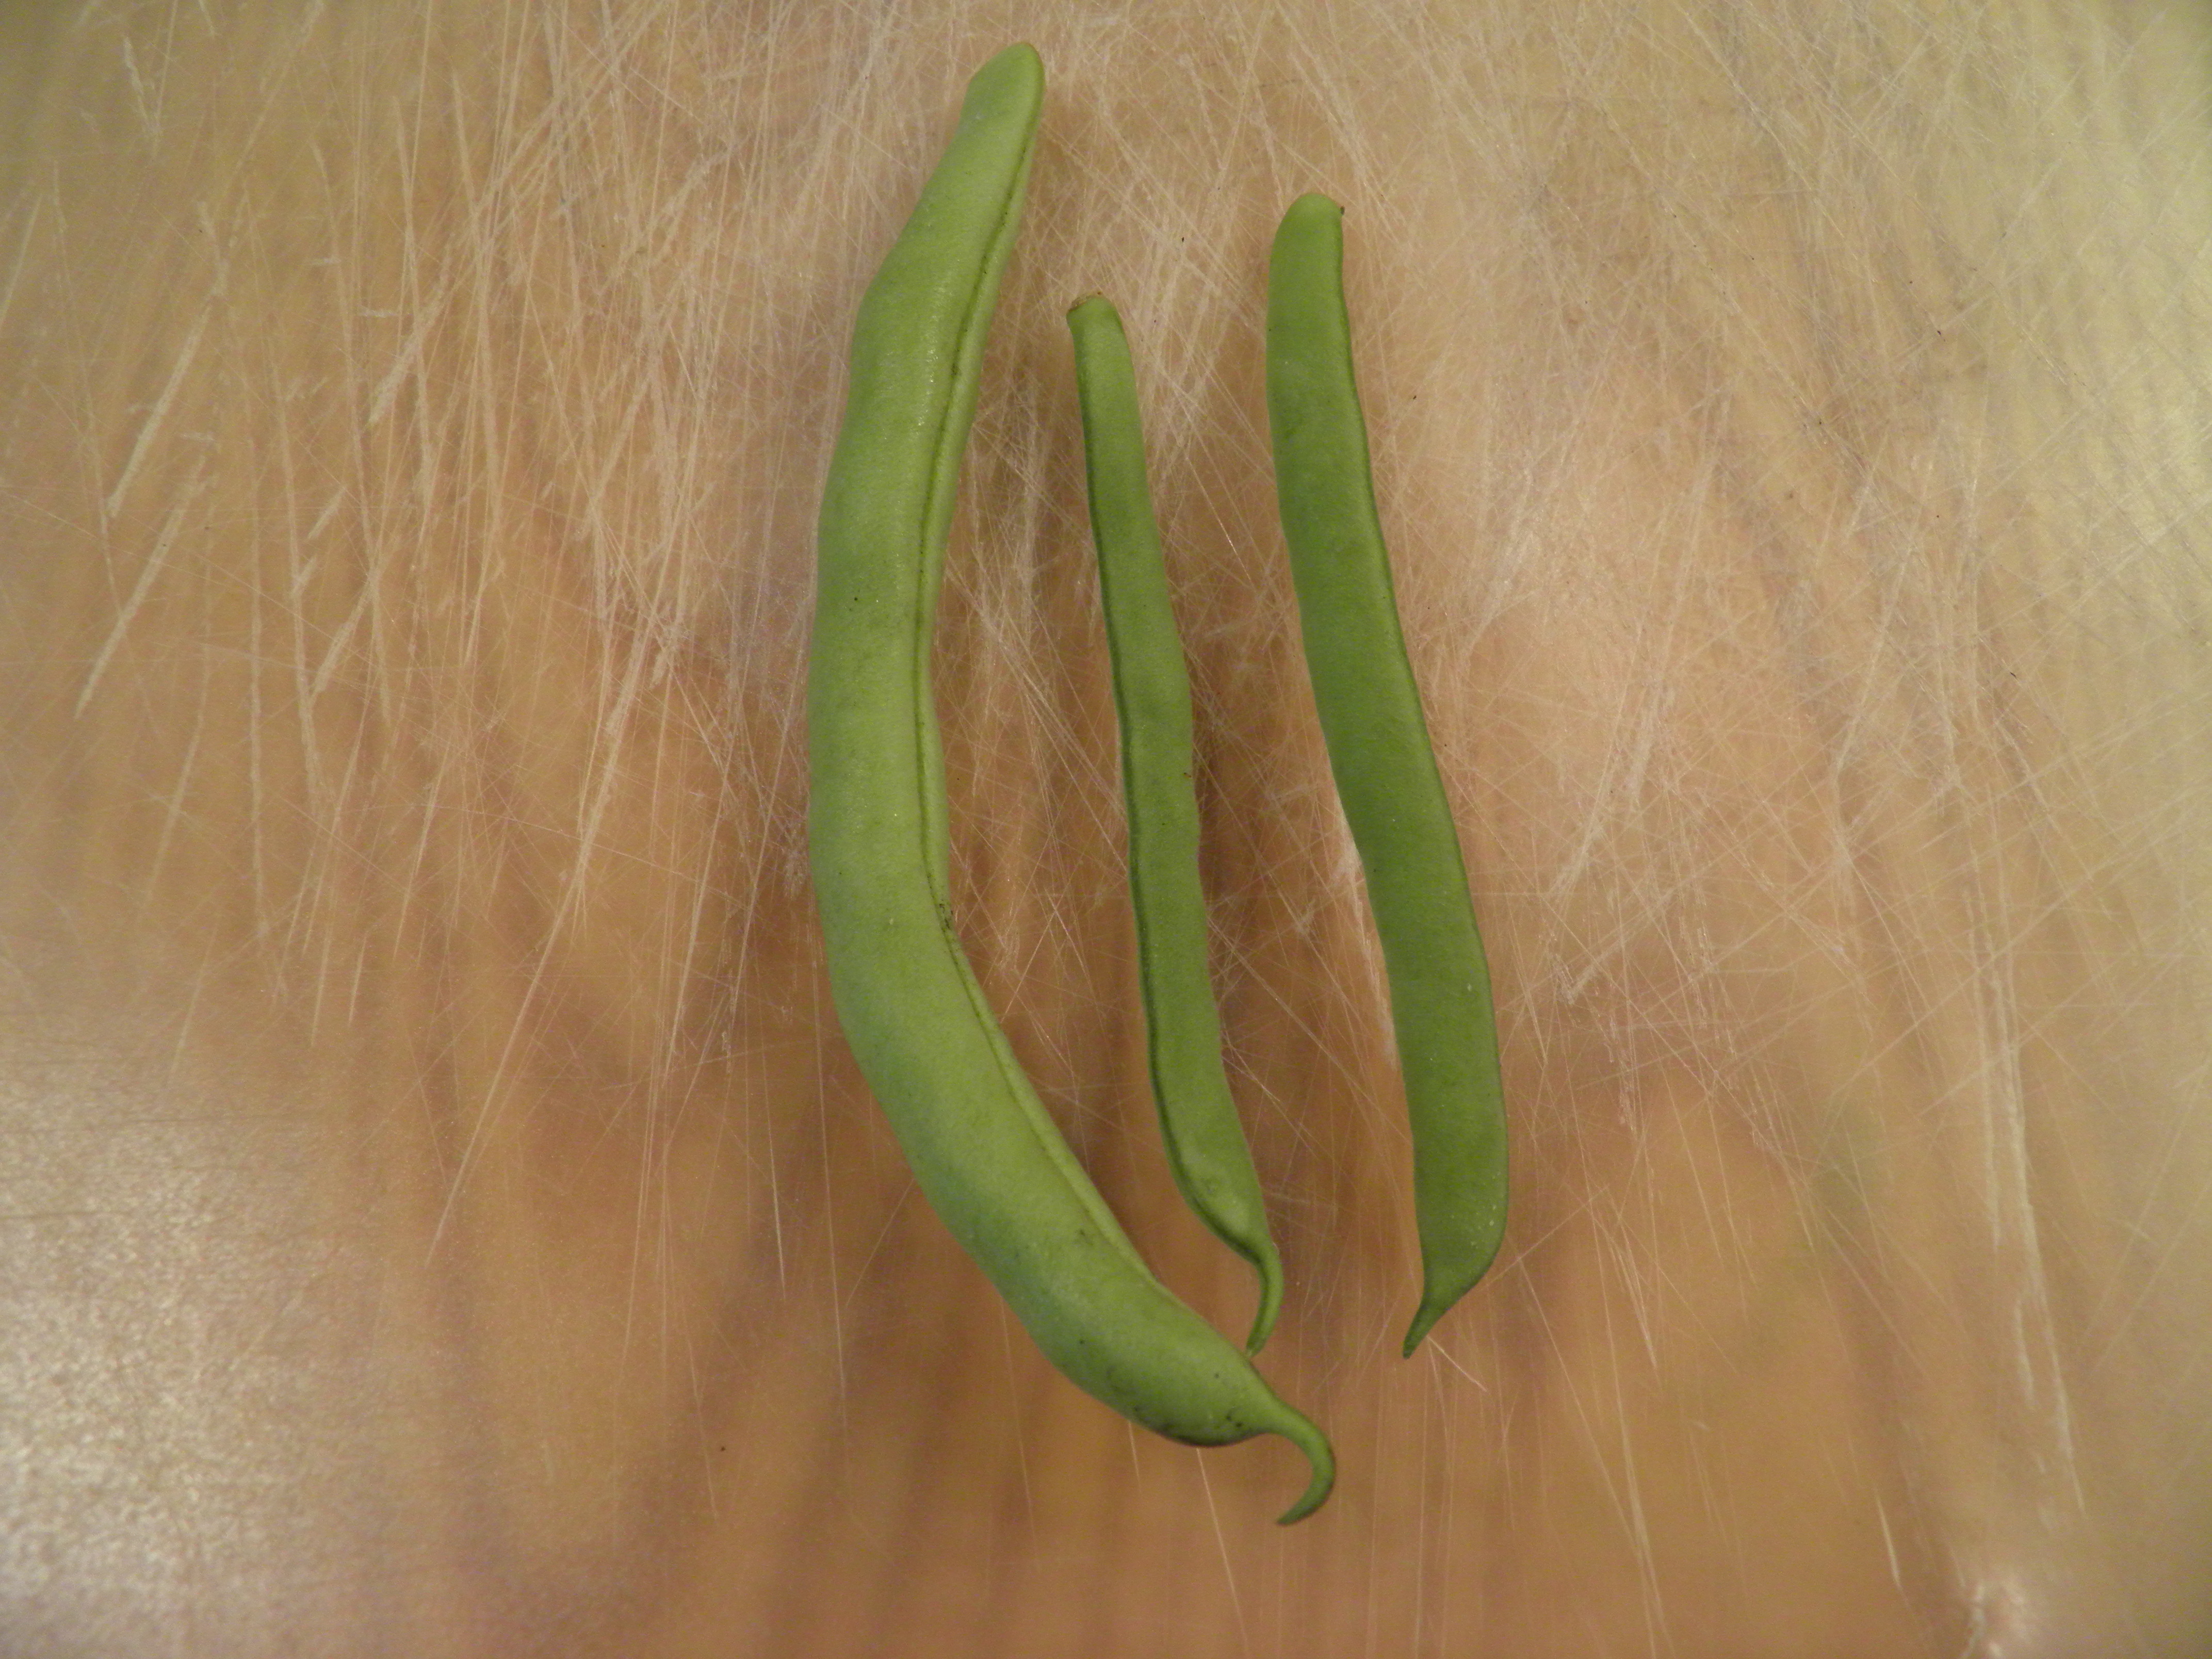
Update 8/5/15: I had a question from Lisa recently about why her dilly beans might have turned out mushy. It occurred to me that a word or three about the size of the beans might be appropriate to the post, and I have a picture to illustrate. In the picture, the bean to the left is too big. It will be tough if “dillied.” A bean this size can be pressure-canned or cooked for a while with ham or bacon and onion or garlic, and it will taste great. But I would not freeze it or “dilly” it. The bean in the middle is too small. You can dilly a bean this size if you wish, and I sometimes fill in the little spaces in the jar with beans this size, but they can over-process quickly. I would not pressure-can a bean this size, because it will be mushy, but this size is perfect for freezing (you only blanch beans for 3 minutes when freezing). The bean on the right is just right! (Sound familiar?) This bean is about the thickness of a pencil (good old #2 like we used in school), and will not get mushy in the jar with a 10-15 minute processing time. It’s also the perfect size for the tall, 12 oz. jelly jars I like to use for dilly beans. I hope this is helpful.
OLYMPUS DIGITAL CAMERA
My green beans are coming on, and my first preservation priority with green beans is a pickle. My two favorite pickles are beets (which I canned a couple of weeks ago) and dilly beans, which I canned just a few days ago. My recipes for both are a bit different from most of the ones you see in canning books and online.
Most of the dilly bean recipes call for cayenne pepper or crushed red pepper. But a few years ago, a good friend of mine, Chris, let me taste her dilly beans with jalapeno peppers, and I was hooked. In a further modification of my own, I began to use serrano peppers instead of jalapenos. For one thing, they’re just a bit spicier, and for another, they take up a lot less room in the jar than jalapenos, therefore leaving more space for the beans.
I’ve also modified my pickled beet recipe, sort of merging two recipes to create a flavor I like better than either of the originals. So here you go—my two favorite pickles.

Spicy Dilly Beans
2 lbs. washed, fresh green beans, trimmed on blossom end to fit jar size
4 Serrano peppers, washed, stems trimmed
4 cloves garlic
4 heads fresh green dill or 4 teaspoons dried dill seeds
2 ½ cups water
2 ½ cups vinegar (5% acidity)
¼ cup pickling/canning salt
Sterilize clean pint or 12 oz. jars in boiling water bath canner for 10 min. Pour boiling water over jar flats, keep hot. Trim stems on peppers back to bright green. With tip of sharp knife, cut two small slits in each pepper, making sure to get all the way into the inner cavity with the knife. Fill hot jars with green beans, making sure that beans fit all the way down inside jar and come up no higher than ¼ inch below lip of jar. Leave room for one garlic clove and one serrano pepper, and the dill, in each jar. If using dried dill seeds, use 1 teaspoon per jar. Bring water, vinegar, and salt to boil, pour boiling brine over beans to within ¼ inch of tops of jars. Wipe rims with clean, damp cloth or paper towel, position jar flats, close with rings, and process in boiling water bath for 10 minutes (add processing time according to altitude chart, if needed). Remove from canner and let cool at least 12 hours before testing seals. Any jars which don’t seal may be stored in the refrigerator for a month, then eaten. This recipe makes about four pint jars or five 12 oz. jars.
Notes: Never let brine continue to boil while filling jars. This may affect acidity levels in the brine and could cause a spoilage problem. Fill jars, and when you’re almost done, turn the heat on your brine mix up high to bring it to the boil.
For canning, make sure the vinegar you are using is 5% acidity. I ran across some white vinegar not long ago that was 4% acidity, and it cannot be used for canning. You may use white or apple cider vinegar for this recipe, but be aware that most white vinegar is made from corn, and nearly all corn these days is both genetically-modified and sprayed with pesticides. I use apple cider vinegar because while apples are sprayed, at least I’m not using a GMO. Besides, I like the flavor.
If you have to trim your beans quite a bit to make them fit the jars, there are a couple of things you can do with the trimmings. Of course, you can cook those trimmings up for dinner (I like them with a little bacon and onion). Or, you can put the short pieces (minus the very blossom end tip), into a separate jar and treat them just like the long dilly beans. Then, those short pieces can be added to salads or chopped for tuna salad. There’s no need to throw them away!
I like to use the tall, 12 oz. jelly jars for dilly beans because I don’t have to trim quite as much off the beans to make them fit.
And a final note on peppers: Serranos are readily available, usually right alongside jalapenos, in your market. I can nearly always find them at Grocery Outlet even in the winter time, grown in California. They are one of my favorite peppers to grow in our short growing season here, good in salsa and about anything else you’d want to use a hot pepper in.

Pickled Beets
3 quarts peeled, cooked, small beets (see below for how to cook and peel beets for this recipe)
1 ¾ cups sugar
2 sticks cinnamon
1 tablespoon whole allspice berries
½ tablespoon whole black peppercorns
1 ½ teaspoons pickling/canning salt
3 ½ cups vinegar (5% acidity)
1 ½ cups water
How to cook and peel beets: Beets must be scrubbed free of any dirt or small stones that like to cling to the roots. (I’ve found that pulling my beets in the evening and letting them soak in cold water all night makes it easier to clean them). Leave the tap roots on, and trim leaves and stems, leaving two inches. (This prevents the beets from bleeding as much color into the water when they are cooking.) Place beets in large pot and cover with boiling water. Bring to boil and cover, reducing heat to medium. Cook beets until tender, and the only way to know they’re tender is to stab them with a fork, but try not to stab them until you’re pretty sure they’re tender, as this releases their color and juice into the water. Small beets take about 20 minutes to get tender, larger beets can take up to 45 minutes. Remove beets from cooking water to colander; let beets drain and cool to touch before trying to peel them. To peel beets: with a sharp paring knife, slice off the top, taking off stems, and then scrape knife down toward the root. If the beet is fully cooked, the skin will come right off. The skin of the beet is dull when cooked; the flesh of the beet will be shiny. It helps to have a damp paper towel handy to wipe off beets after peeling. Cut off tap roots. If using small beets, cut into quarters. If using large beets, cut into 1 ½ inch chunks or quarter and slice.
Pickling Directions:
In large saucepan, combine sugar, water, vinegar, cinnamon sticks, allspice berries, peppercorns, and salt, bring to simmer, cover and simmer 15 minutes. Remove cinnamon. Bring liquid to boiling before pouring over beets in jars.
Pack cooked, peeled, cut beets into clean, hot pint or half-pint jars, leaving ¼ inch head space at top of jar. Cover beets with boiling brine (include allspice berries and peppercorns), leaving ¼ inch head space. Cap with hot flats and rings, and process in boiling water bath for 30 minutes (adjust processing time as needed for high altitudes). Cool for at least 12 hours before testing seals. Any jar which doesn’t seal may be stored in the refrigerator for a month, then eaten.
Notes: I use beets of all sizes, however they come out of my garden, but I like the smaller beets, up to about 2 inches in diameter, best for pickling. They only need to be cut into quarters. I often use larger beets for this if that’s what I have, but they have to be cut up into smaller pieces before putting them in the jar. I like them in chunks, but they can be sliced as well. Quarter and then slice large beets into ¼ inch slices. Just a warning, I find the slices tend to crumble a bit when being removed from the jar.
This recipe uses a bit less sugar than the original Ball Blue Book recipe does, and I’ve added the peppercorns, which are a feature of the recipe for pickled beets in Canning for A New Generation, a canning book I just love. The black peppercorns give a nice depth of flavor and just a bit more spice to the traditionally sweet-spiced beets. I love that little bit of heat with the sweet.
As with the dilly bean recipe above, you may use either white vinegar or apple cider vinegar. I prefer apple cider vinegar for the reasons mentioned earlier.
These two pickles are always on our Thanksgiving table. To me, a big holiday dinner isn’t complete without a pickle plate, and a pickle plate isn’t complete without dilly beans and pickled beets.

Oh yummy! I am glad you had garden left after the long trip.
Thanks, Kelly. I always set my garden up so it can survive on its own because my husband likes to travel in the summer. It’s kind of amazing to come home and see how the garden has thrived without me. It does better without me than I do without it! Good soil and consistent watering makes a big difference.
Pingback: Saving Seeds | Garden, Forest, Field
I’m new to making dilly beans and I’ve actually never had them before. I processed a couple of jars and taste tested one of them. What is there consistentecy suppose to be? I was under the impression they were suppose to be crunchy. Mine are a little more like cooked green beans. Not as soft, but more toward the soft side. I processed them for between 10-15 because of the altitude I’m in. Thanks for any input.
You’re right, Lisa, they should be crunchy, almost like a pickle. If yours aren’t, it could be the processing time, but it also could be the bean itself. If the beans were too big, they’ll be softer and/or tougher after processing. Also, it does take some time for the pickling to happen. I don’t open mine for at least a month, because they are actually pickling in the jar. And it’s possible that the variety of bean that you used is the problem too. Not all green beans are equal! My favorite variety for canning and dilly beans is Blue Lake. They are stringless and crisp. Also, the beans should snap easily when fresh, and they shouldn’t be old or limp, or they won’t crisp up in the jar. One thing you could try, if you make them again, is the same trick I use when making cucumber pickles. I soak the cucumbers in ice water for a couple of hours or overnight to crisp them up. That might work with beans, too, although I wouldn’t leave them overnight, maybe just an hour or two, max. I hope that helps!
Lisa, I replied to your previous comment, but I am adding an update about the right size of beans to dilly to the post, in case you are interested.